
Complete Radon Mitigation System Cost Guide (2024)
Average Cost of a Radon Mitigation System
The average cost of a fully installed radon mitigation system is around $2100. However, crawlspaces are much more expensive, so if you remove them from the equation, the average cost is about $1750.
However, the cost of living in Northern Virginia is about 50 percent higher than the national average. Accordingly, radon mitigation systems cost around 10-30 percent more than the national average.
Additionally, we based these averages on running your pipes outside along the exterior of your home. Not surprisingly, some people would prefer to conceal these pipes inside their homes. The project requires more time and effort and costs much more.
Finally, we based these average costs on a 2000 sq ft home. The prices will increase if you have a larger or more luxurious house.
Radon Mitigation Average Cost for a One-Story Home on a Slab Foundation
Regarding the cost of a radon reduction system, a single-story house on a slab foundation would be the cheapest scenario because fewer materials and labor are involved in the process. You can expect to pay about $1600 for such a house.
Radon Mitigation Average Cost for a One-Story Home on a Basement Foundation
Single-story homes on basement foundations are still simple. You can expect to pay about $1750.
Radon Mitigation Average Cost for a Two-Story Home on a Basement Foundation
To continue our example, a two-story home built on a basement foundation will cost around $1950 to be radon-mitigated
Radon Mitigation Average Cost for a Two-Story Home on a Crawl Space Foundation
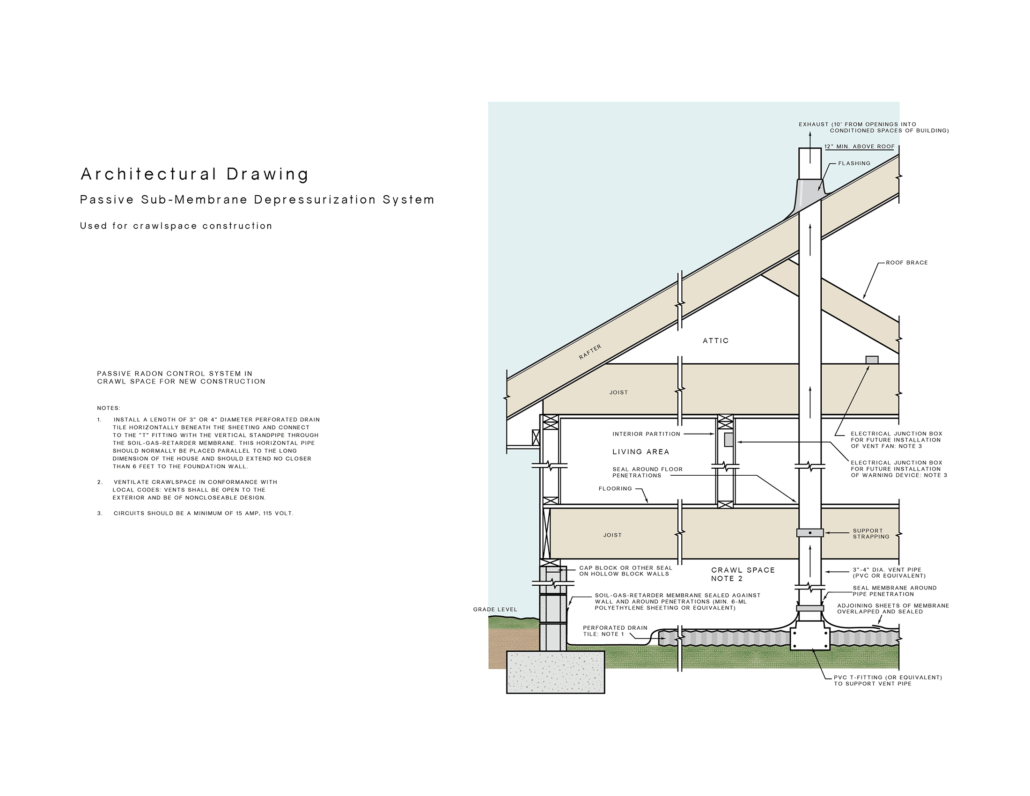
The average radon mitigation system cost for a house in a crawlspace is around $2800. This is one of the most expensive radon mitigation systems. The additional cost makes sense once you understand the basics of a sub-membrane depressurization system.
Factors That Affect Your Radon Mitigation Cost
The cost of radon mitigation can vary significantly depending on several factors. Understanding these factors will help estimate the overall pricing for a radon mitigation system. Here’s a breakdown of the key factors and associated costs:
Radon Levels
- Impact: Higher radon levels may require more complex or powerful mitigation systems.
- Cost Influence: Systems designed to handle higher levels often cost more due to the need for more robust fans or additional system components.
Size and Design of the Home
- Impact: Larger homes, or those with multiple foundations (like a basement and a crawl space), may require more extensive mitigation systems.
- Cost Influence: Installing systems in larger homes or homes with complex designs typically incurs higher costs due to the need for more materials and labor.
Type of Mitigation System
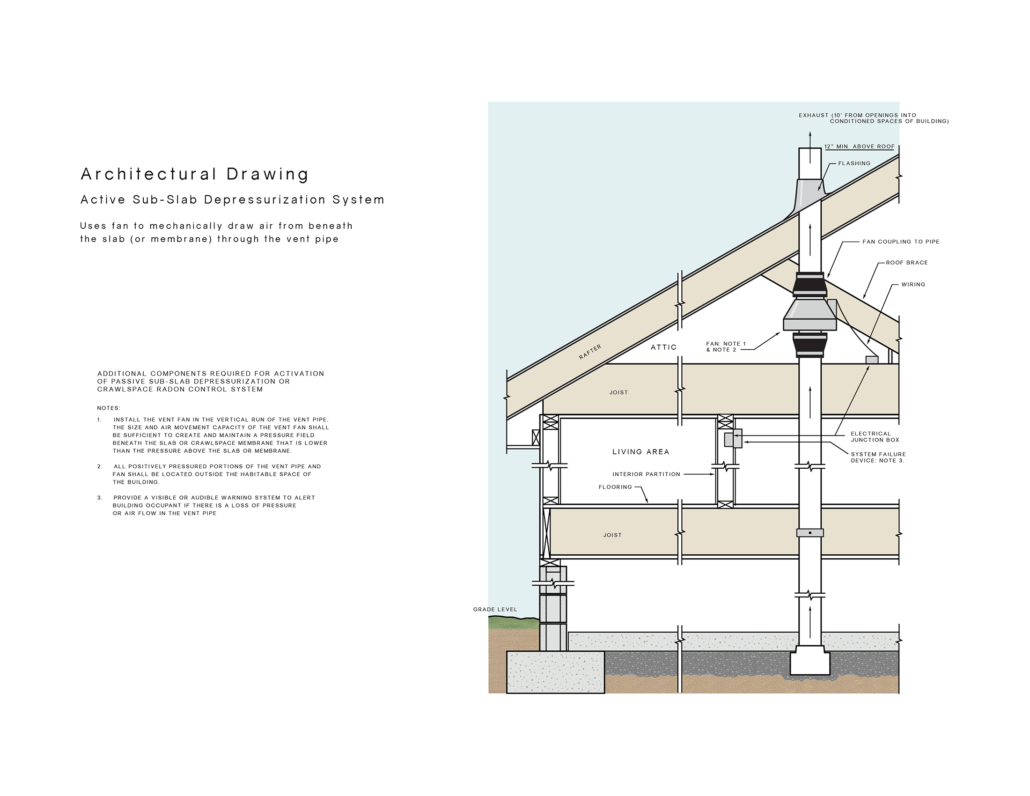
- Sub-Slab Depressurization: Common in homes with basements or slab-on-grade foundations.
- Sub-membrane depressurization: Homes with crawlspaces require this system, which involves creating an airtight membrane with plastic sheeting.
- Cost Influence: The type of system impacts the overall cost, with sub-membrane systems often being more expensive than sub-slab systems.
Foundation Type
- Impact: Different foundations (slab, basement, crawl space) require different mitigation approaches.
- Cost Influence: Crawl spaces require more extensive work and materials, leading to higher costs.
Local Labor Rates
- Impact: Costs for professional installation can vary significantly by region.
- Cost Influence: Areas with higher living costs typically have higher labor rates.
Installation Complexity
- Impact: The need for custom solutions, such as routing pipes through difficult areas, can add complexity.
- Cost Influence: More complex installations require more time and skill, leading to higher costs.
Additional Repairs and Preparations
- Impact: Sealing cracks and gaps in the foundation can be a necessary part of the mitigation process.
- Cost Influence: Additional repairs and preparations can add to the overall cost.
Electrical Work
- Impact: Most radon mitigation systems require an electrical outlet for the fan.
- Cost Influence: New electrical wiring or outlets can add to the cost, especially if a qualified electrician is required.
Materials Used
- Impact: The quality and type of materials (pipes, fans, sealants) can vary.
- Cost Influence: Higher quality materials usually increase costs but may offer better longevity and performance.
Aesthetic Considerations
- Impact: Preferences for concealing pipes or other components can add complexity.
- Cost Influence: Aesthetic modifications can increase costs due to additional labor and materials.
Additional Considerations
- Maintenance Costs: Regular system maintenance and occasional fan replacements (fans usually last 5 to 11 years).
- Post-Installation Testing: Ensuring the system effectively reduces radon levels, which incurs additional costs.
Understanding Radon Mitigation
Radon mitigation is the process of reducing radon gas concentrations in the breathing zones of occupied buildings or radon from water supplies. Radon is a radioactive gas that occurs naturally as a decay product of uranium. It is found in soil, rock, and water and can accumulate in buildings, especially in confined areas such as basements and crawl spaces. Radon is hazardous to health; it’s the second leading cause of lung cancer after smoking.
Understanding how radon mitigation works involves knowing a bit about how radon enters a building and the methods used to reduce its concentration:
How Radon Enters a Building:
- Cracks in Floors and Walls: Radon gas can enter through cracks in floors, walls, and foundations.
- Gaps Around Service Pipes: Openings around pipes and wires can provide a path for radon.
- Cavities Inside Walls: Radon can enter through the cavities in walls.
- Water Supply: Though less common, radon can be released into the air from water, especially if it’s from a well.
Common Radon Mitigation Methods:
- Sub-Slab Depressurization (SSD): This is the most common and usually the most reliable radon reduction method. The mitigator inserts a pipe through the foundation floor slab into the soil beneath the house. A radon vent fan connected to the pipe creates a vacuum in the soil, preventing radon from entering the home. The fan discharges the gas above the roofline, where it disperses harmlessly.
- Sub-membrane depressurization: This is similar to SSD but used in crawl spaces. The mitigator installs 10mil or higher plastic sheeting over the dirt floor, and a vent pipe and fan draw the radon from under the sheet and vent it outside. All of the seams and edges get sealed with permanent tape or other methods.
- Heat Recovery Ventilator (HRV) or Air-to-Air Heat Exchanger: This method increases ventilation by using a fan to bring in outdoor air. It’s particularly effective in colder climates where homes are tightly sealed during the winter.
- Water Treatment: If radon is present in water, treatment options include aeration or carbon filters.
Steps and Costs for Sub-Slab Radon Mitigation System
If you understand the steps involved, you will feel more comfortable choosing a more expensive company of higher quality.
1. Design the system
Taking measurements and determining the best placement could take up to an hour for your contractors.
2. Verify that there is adequate airflow
Upon selecting the location, the mitigator drills small holes in the concrete floor. The mitigator places a fan over one hole and releases test smoke over another hole. They are looking to see if the fan draws in the smoke, which indicates good airflow. Testing of this type also confirms the need for more than one fan. To reduce radon levels in larger homes, multiple fans may be required.
3. Sealing Gaps and Cracks
A sealed basement floor/wall helps prevent radon gas from entering through the house’s exterior walls and foundation. Additionally, it minimizes how interior air the fan pulls into the radon mitigation system. Radon gas can enter the home through expansion joints, cracks, openings surrounding penetrations, and sump pumps.
Despite this, most professionals agree that sealing alone will not mitigate high radon levels. Since it is nearly impossible to make a foundation airtight, the most practical solution is to create a negative pressure under the foundation.
4. Drilling holes
To mitigate radon, your radon mitigation company must drill clean holes through several inches of concrete. You will need at least two holes – one through the basement floor and one through the exterior wall. Unfortunately, some companies use cheap tools and poor practices, resulting in large, ugly holes prone to further damage.
5. Adding the electrical components
Whether your radon mitigation contractor does the electrical work themselves, subcontracts it out, or instructs you to hire an electrician, the radon fan requires a junction box nearby.
6. Final Assembly and Installation
After assembling the PVC pipes and radon fan, the final touches are applied, such as sealing the penetrations. The exhaust pipe must terminate above the roof to prevent radon gas from reentering the home.
7. Final Smoke Check
After installing the sub-slab depressurization system, the best radon mitigation contractors perform a smoke test to check for leaks.
8. Conduct a Radon test
A third-party professional radon test is the final step in any radon mitigation project. This ensures that the radon mitigation system is successful. Although there is no safe level for radon, mitigation can reduce radon levels by up to 99 percent.
Cost Breakdown For Radon Mitigation System
Here’s a general cost breakdown for a typical radon mitigation system.
Basement or Slab
Radon Fan – $200-$400
Piping – $100-$200
Crack Sealer – $50-$100
Electrical – $300-$500
Labor – $600-$1000
Third-Party Radon Test – $200
Crawlspace
Radon Radon -$200-$400
Drain Tile – $200-$300
12 Mil Vapor Barrier – $400-$600
Permanent tape – $200 – $300
Pipe – $100-$150
Electrical – $300-$500
Labor – $1000-$2000
Third-Party Radon Test – $200
How to Find a Radon Mitigation Contractor
The National Radon Proficiency Program (NRPP) website is the best place to find qualified radon mitigation companies. Then, you can cross-reference the mitigators in your area on your favorite review site, such as Google. Getting at least three quotes before awarding the job is best.
Bottom Line
Radon is the second leading cause of lung cancer. Although some companies advertise radon mitigation for under $1000, our experience is that cheap systems cost more in the long run. If you have a radon problem, the best way to lower your health risk is to hire the best radon mitigation specialist in your area. It may cost double the cheapest estimate, but it’s worth it.